Using Jupyter Notebooks with Otter to create and automatically grade assignments
This is a detailed description of the process. Click here for a quickstart version of the info on this page.
Using Otter together with Jupyer Notebook, one can add questions to their assignments that can be automatically graded, by running a simple script. In principle, after you write an assignment question, you can write any number of unit tests, from which you can choose which the students can see or not. You then use Otter to generate a target Notebook that you can share with the students. The generated notebook hides solutions, chosen tests and configuration options from the students. You can then share this file with the students through Canvas. After the deadline, you collect all the solutions from the students, and run a provided script, which in turn uses Otter to perform grading and create PDFs with feedback for the students (i.e. detailed results of testing). The results are also saved in a spreadsheet for quick access.
About Otter
Otter is an autograding library, which can be used to grade assignments written in R or Python. Here we focus on using Otter for grading Jupyter Notebooks with Python. In a Notebook, you can write questions, solutions to questions, tests, as well as customise various aspects of these, such as the points per questions or test. You can then use Otter to generate a student version of your notebook, which has solutions (as well as tests of your choice) hidden form the student. You share the generated notebook with the students, and after collecting their submissions, you can run a script that goes through all submissions and assigns a score to each answer based on the tests you defined. PDFs with feedback for the students can be optionally generated.For the instructor, the process can be divided in roughly 3 stages, with the first being the most involved:
- Create an Notebook assignment: specify configuration options, write questions, solution, define tests visible to students, as well as hidden tests
- Generate a student version of the notebook and an autograding zip file(used later during autograding)
- Collect submission and run the provided script to automatically grade all the submissions and collect the scores in a CSV file
With Otter, you define blocks which can contain questions, tests, solutions or configuration. Otter uses raw notebook cells to delimit blocks. All blocks start with an # flowed by the block name. All blocks(except for the # ASSIGNMENT-CONFIGURATION) need to be closed with another raw notebook cell. Inside code cells, you also use comment like markers to configure how the respective code should be treated(i.e. how many points a test case has, if a test or piece of code is hidden from the student). Below you can find an example on how blocks are defined and how you can write solutions and tests for a question(note the use of # markers in raw cells as well as within code):

Creating (Python) Notebooks and generating student version
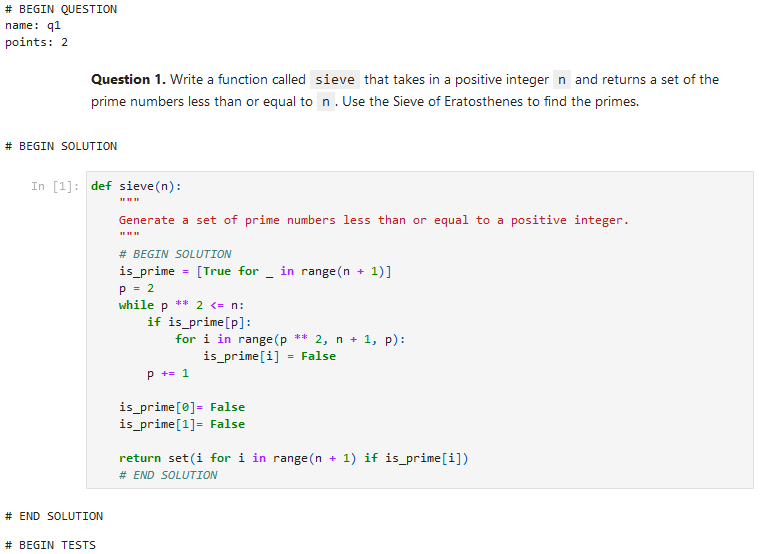
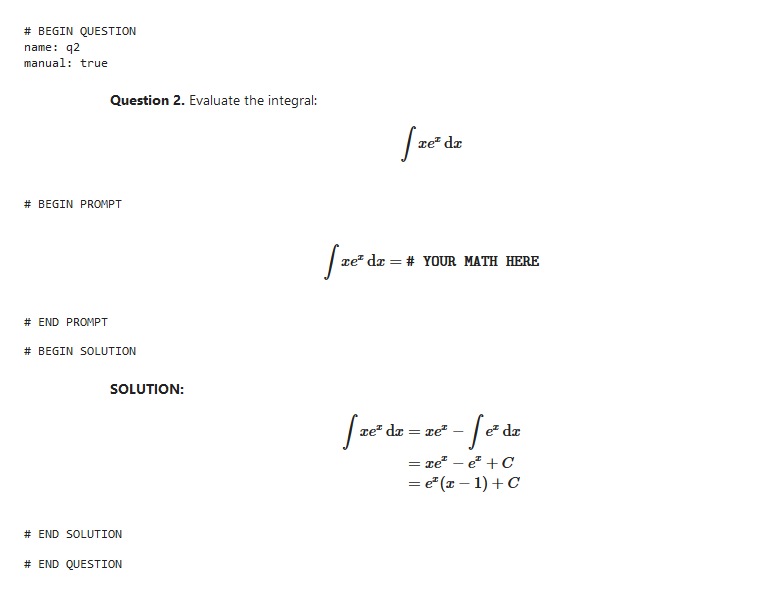
To start with, you create a main notebook in which you write the assignment descriptions and parts of the code you want your students to see, alongside full solutions, public tests and hidden tests. Questions can also be marked as manual, in which case the Otter will not autograde them, and you can also include solutions for non-code questions. The following images show how you can create automatic and manual questions:
The above images are taken from the demo file which can be found here, alongside an introductory tutorial from the Otter documentation.
Furthermore, you can declare assignment configuration options in a cell marked with # ASSIGNMENT CONFIG. Click here for a detailed overview of all configuration options and their descriptions.. These are written in YAML format. If not, values are given, these config options take on default values, as seen in the previous link. Some examples (written as “option_name: default_value”):
name: null                                   # a name for the assignment (to validate that students submit to the correct autograder)
requirements: null                           # the path to a requirements.txt file or a list of packages
run_tests: true                              # whether to run the assignment tests against the autograder notebook
solutions_pdf: false                         # whether to generate a PDF of the solutions notebook
init_cell: true                              # whether to include an Otter initialization cell in the output notebooks
seed:                                        # intercell seeding configurations
  variable: null                             # a variable name to override with the autograder seed during grading
  autograder_value: null                     # the value of the autograder seed
  student_value: null                        # the value of the student seed
Configurations can also be imported from a separate YAML file(useful for sharing configs across assignments) with “config_file”:
config_file: null                            # path to a file containing assignment configurations; any configurations in this file are overridden by the in-notebook config
Configurations can also be imported from a separate YAML file (useful for sharing configs across assignments) with “config_file”:
config_file: null # path to a file containing assignment configurations; any configurations in this file are overridden by the in-notebook config
Example of # ASSIGNMENT CONFIG:

Block types
# BEGIN QUESTION - mark beginning of a question. Can be followed by question configuration options (YAML-formatted):
name: null        # (required) the path to a requirements.txt file
manual: false     # whether this is a manually-graded question
points: null      # how many points this question is worth; defaults to 1 internally
check_cell: true  # whether to include a check cell after this question (for autograded questions only)
export: false     # whether to force-include this question in the exported PDF
# END QUESTION – marks the end of a question. Place this after you have written the solution and the tests.
# BEGIN SOLUTION and # END SOLUTION - mark the beginning and end of a solution block. The same marks can be used within a code cell to hide code from students(see below)
# BEGIN TEST and # END TEST - marks the beginning and end of a set of test cells
Code cell marks
Within blocks, you can further customize how the code in each cell should be treated:
# BEGIN SOLUTION and # END SOLUTION - code between these markers will be excluded from the student's notebook
# HIDDEN - used within test blocks. Tests after this will be hidden to the student. They are still called during autograding.
# BEGIN TEST CONFIG and # END TEST CONFIG – beginning and ending of test config options. Use this to finely tune test cases: you can create hidden tests, set the number of points for a question or present success or failure messages to students after tests. Possible options (YAML-formatted):
hidden: false          # whether the test is hidden
points: null           # the point value of the test
success_message: null  # a messsge to show to the student when the test case passes
failure_message: null  # a messsge to show to the student when the test case fails
# IGNORE - line won't be included neither in the student's notebook, nor in the autograding
Example of usage of both block delimiters with configuration, as well as cell code markers below:
Manually graded questions
Using the “manual” question config option, you can also specify manual questions, for which no tests will be run, but can be handled like any other questions. Below is an example for which the solution is hidden from the students, taken from the Otter docs:
Points per question and test
Points can be specified for both the question and specific tests. For example, you can have a 5 point question, with two tests being worth 1 point, and one test being worth 3 points. As a rule of thumb, ensure that the points from tests sum up to the total points of the question, otherwise Otter will make assumption about how to allocate points to tests. You can read more about how Otter resolves points here. If you only specify points for the question, the points will be evenly distributed among the tests.
Generating student notebooks and autograding configuration files
When you’re finished creating the assignment, you can Otter to generate the student version of the Notebook and the necessary files for autograding. For now, we only make use of the “autograder.zip” file. Open a terminal in your Jupyter environment (File→New Launcher→Other→Terminal). This will open a shell from which you can commands like on any Linux system. The shell opens at the location you Jupyter File Browser (the file tree to the left of the screen) is currently at. To generate the file, run:
otter assign <path-to-notebook> <destination-folder>
Where path <path-to-notebook> is the location of the Jupyter file in which you have written the assignment and <destination-folder> is where you want your generated files to be saved.
Example:
otter assign ml_hw1.ipynb dist
This will create a folder named “dist”, in which you’ll have two subfolders:
autograderin which you’ll find the autograder.zip file, your original assignment notebook with all tests ran, a pdf version of it, and some other config filesstudentin which you’ll find the notebook you can share with your students. This doesn’t include the solutions and the hidden tests
Running the grading script
We provide a custom script to help you with the grading process. The script we provide can be downloaded from here and can be used to automatically grade any number of assignments, generated pdfs with the ran tests and collect the grades for each assignment in a separate csv file. To run the script, open a terminal in your Jupyter environment (File→New Launcher→Other→Terminal), cd to where the script is located and run:
python assignment_grader.py -a <path-to-autograder-zip> -s <path-to-student-submissions> -c <where-to-save-csv> -tp <whether-to-generate-feedback-pdfs> -p <where-to-save-pdfs>
To get a detailed usage description, run:
python assignment_grader.py -h
All arguments are optional. By default: -a, –autograder, will try to find “./dist/autograder/autograder.zip” -s, –submissions, will look into “./submissions/ipynbs” -c, –csv, will save to “./csv” -tp, which can take values 0 or 1, is set to 1 -p, –pdf, will save to “./pdf” Example usage:
python assignment_grader.py -a ml_hw1/dist/autograder/autograder.zip -s ml_hw1/submissions -c ml_hw1/results -tp 1 -p /ml_hw1/test_feedback